Showing posts with label whole-grain. Show all posts

Wednesday, September 5, 2018

Quinoa "Fried Rice"


I make this dish so often I thought I'd share, just in case you'd like to add it to your weeknight repertoire. It comes together quickly, especially if you prep the sesame ginger sauce in advance. I like to make a double batch of the sauce to store in the fridge, as it keeps for several weeks.
It's the perfect dish for someone who is quinoa-curious, but maybe a little intimidated as well. See? There's nothing to be scared of.
You can vary the vegetables- I'll often use green beans in place of broccoli or throw in some chopped garlic scapes when they are in season. You can finish it with your favorite hot sauce, chopped cilantro or salty peanuts for a crunch.

You're now two pans and 30 minutes away from a dinner chocked full of high quality protein, fiber and stir-fried veggies. 
Quinoa Fried “Rice”
Serves 2 as a main dish
Ingredients
3 tbs. tahini
3 tbs. tamari soy sauce
2 tbs. honey or syrup
1 tbs. toasted sesame oil
2 garlic cloves
1-inch ginger root

½ cup quinoa
1 cup water or stock
2 tbs. oil of choice, divided
Small head of broccoli, about 1 cup chopped
1 small carrot,  grated
2 eggs 
2 tbs. sesame seeds
Chili flakes, if desired 
Directions
Place quinoa and water/stock in a small pot. Bring to a boil and turn down to a simmer. Cook for 15-20 minutes, covered, or until all liquid is absorbed. Remove lid, fluff and set aside.
To make the sesame ginger sauce, combine tahini through ginger in a blender and process until smooth. Set aside.
Beat eggs in a small bowl. Season with a dash of salt and pepper.  
Heat 1 tbs. oil over medium heat in a large pan. Add eggs and scramble quickly. Remove to a small bowl and break up into small pieces. Wipe pan clean. Add remaining tbs. of oil to the pan along with carrots and broccoli and stir-fry until bright and tender, about 5 minutes. Add cooked quinoa, scrambled eggs, 4-6 tbs. sesame ginger sauce and sesame seeds and continue to stir-fry for 3 minutes.  Taste and adjust seasoning with salt and chili flakes if desired.

Sunday, April 10, 2016

Pumpkin Mac and Cheese with Toasted Breadcrumbs


This is pure comfort food. Since it is April and still feels like winter, I'm allowing it. 

Finding a love for whole foods can be a journey, which sometimes takes years to develop and cement. It's a transition, and like any other transition, baby steps are often necessary. This is a great recipe for a transitional kitchen, one that helps convince skeptics that whole foods and healthier ingredients can still be delicious and satisfying. And so the momentum builds. And bellies are warmed.

For the deepest flavor, I highly recommend roasting a pumpkin (or any winter squash) and scooping out the inside to be used in this recipe. If you are short on time or energy, canned pumpkin puree can be used, and will still be delicious (just not as delicious!). So no excuses.

This recipe can be made vegan by simply omitting the cheddar cheese. Or you can swing the other way and increase the dairy by using cow's milk in place of soy milk. Either way, I promise you'll love it. 

You can even make a double batch, and freeze the second one in lunch size portions. One of our secrets to weekday success is having a stocked freezer from past meals. I chill the second one, cut it into desired portions, place those on a parchment paper lined baking sheet to freeze, and then move each one into a labeled quart sized freezer bag. 

Pumpkin Mac and Cheese with Toasted Breadcrumbs
Serves 4-6

Ingredients

3 Tbs. olive oil
1 medium onion, diced
1/4 cup whole wheat flour
2 1/2 cups soy milk
1 cup pumpkin puree
1 cup sharp cheddar cheese, shredded
1/2 tsp. salt 
pinch of nutmeg
1/4 tsp. freshly ground black pepper
a dash of turmeric, optional
Additional salt and pepper, as needed

1/2 lb. whole wheat pasta shells, cooked
1/2 cup breadcrumbs

2 tbs. sage leaves, sliced thinly

Directions

Cook shells al dente, according to package directions. Drain and set aside.

Preheat oven to 350 degrees.

Heat olive oil over low-medium heat in a medium pot. Add diced onions and cook until translucent. Sprinkle in flour and stir constantly for one minute, to toast slightly. Slowly pour in soy milk, a half cup or so at a time, stirring with a whisk to prevent clumping. Once incorporated, add pumpkin and continue to cook for 15-20 minutes, stirring often, or until thickened. Add shredded cheese, salt, nutmeg, black pepper and dash of turmeric. Taste and season with additional salt if needed (don't under-salt!)

Mix pumpkin cheese sauce with cooked pasta shells and pour into a oiled baking pan. Top with breadcrumbs. Bake in 350 degree oven for 25 minutes, or until sides are bubbling and breadcrumbs are toasty. Serve garnished with sage. 

Relax. Eat Well.


Sunday, January 11, 2015

Foolproof Granola Recipe


I posted a Cherry Pecan Granola recipe a few years back, which I still enjoy, but have found that I'm keeping my granolas even simpler these days. I ditched the apple juice, amped up the maple syrup and paired down the spices, to create a "foolproof" granola recipe that can act as a base recipe and later customized to any individual whim.


Each time we run out, the lazy side of me is tempted to simply buy some locally made granola at the coop, but once I get there and start comparing ingredient lists and prices per pound, I am always convinced to pick up some $1.49/lb organic rolled oats and set off to make my own.


The ingredients are simple and the process is a breeze. Not too sweet, but with a hint of maple- if you crave more, feel free to add an extra tablespoon or two. At my house, we like to add our dried fruit into our bowl when serving, instead of mixing it into the stored granola- that way each morning's bowl can be different, and there is no chance of moisture sneaking it's way into the batch.


Enjoy this over yogurt, with fresh, frozen or dried fruit, an extra sprinkling or ground flax or hemp seeds, and whatever else your heart desires. Or kick it up a notch and serve it for dessert by melting some dark chocolate, drizzling it into a bowl of granola, tossing to coat and hardening it in the freezer. Your very own chocolate covered granola bites (or granola covered chocolate bites?)


My only two heads of warning: Don't skimp on the salt, and make sure you buy thick cut rolled oats. 

Basic Granola Recipe
Makes about 5 cups

Ingredients

4 cups thick rolled oats

1 tsp. sea salt

1 tsp. cinnamon

4 tbs. maple syrup

2 tbs. grapeseed or olive oil

2 tbs. chia seeds (optional)

1 cup large coconut flakes or raw almonds (or walnuts/cashews etc.)

Optional additions:

Spices: ginger, allspice, nutmeg, cardamon etc. - to be added in before baking

Dried fruit: apricots, quartered figs, sliced dates, cranberries, currants, apple, mango etc. - to be added in after baking

Directions

Preheat the oven to 350 degrees. Toss everything but the coconut/nuts and dried fruit in a large bowl, and stir well to combine. Spread mixture evenly on 2 standard baking sheets- one of the tricks is to make sure you have a thin layer, to optimize toasting and eliminate the sog-factor. 

Bake for 10 minutes. Remove, stir, add almonds/nuts or coconut flakes and bake for another 8 minutes, or until beginning to get nice and toasty.

Cool and transfer to an airtight container to be stored at room temperature for up to a month, or in the freezer indefinitely. At this point you can choose to add in your dried fruit of choice, or leave it out to keep it simple and customize by the bowl. 

Friday, June 6, 2014

Grab and Go Polenta Quiche


 I want chickens more than anything. It will be a reality soon, but I have to wait until some other areas of my life cool off first. In the meantime, I am enjoying farm fresh eggs from my neighbors as often as possible, and creating an arsenal of egg recipes for when my time of surplus arrives.


Breakfast is a tricky meal for many people. Often times, especially for kids, it ends up being a very quick grab-and-go situation, often laden with sugar and empty carbohydrates. In reality, most of us do better with some protein in the morning- and hey, why not throw in some vegetables as well?

These mini quiches can be prepared ahead in big batches, and stored in the fridge for the week. They make a perfect grab-and-go breakfast or lunch. Like most of my recipes- the ingredients are very flexible. Feel free to work with what you have in the kitchen that week, and according to your individual preferences. If red onion, mushrooms and bell peppers aren't your thing, other vegetables that pop into mind are scallions, potatoes, fresh herbs, spinach or broccoli. Just make sure to cook any vegetables you are using appropriately before the final assembly of the quiche. Chèvre or cheddar would also be great substations for the feta, if you lean that way.


The turmeric is optional- I love the extra orange hue it lends, on top of it's superfood antioxidant load. I try to sneak it into my routine whenever possible.

I tried these guys with parchment paper lined muffin tins, and as well as well-oiled tins. Either way worked, but I would honestly forgo the parchment paper - it wasn't entirely necessary and the results were "more aesthetically pleasing" without.

Polenta Quiche
Makes 12 mini quiches

Ingredients

2 1/2 cups water
3/4 tsp sea salt
1 cup polenta, or corn grits
1/2 cup grated parmesan
1 tbs. olive oil
1 egg
a few cranks of black pepper

1 tsp. olive oil
1/2 cup red onion, medium chop
1 portabella mushroom, sliced
1 red bell pepper, chopped
1 large (or 2 small) garlic clove, minced

1/3 cup crumbled feta

4 eggs
1/4 tsp salt
1/4 tsp. turmeric
ground black pepper

Extra parmesan or grated cheese to garnish (optional)

Directions

Preheat to 400 degrees.

Bring water and salt to a boil in a small pot. Stream polenta into boiling water, using a whisk to stir constantly for 5-10 minutes, until thick. Turn off heat, add parmesan, olive oil, egg and black pepper.

Line muffin tins with parchment paper or spray thoroughly with oil. Divide polenta and spoon into muffin tins. Let cool for 5 minutes. With wet fingers (to avoid sticking), press polenta into the bottom of the cups and spread up the sides, to create a nice indent for as much filling as possible. Thinner is better. Place in oven and bake for 10-15 minutes, or until dry to the touch, checking and rotating after 10 minutes. Set aside.

In the meantime, heat 1 tsp. olive oil in a small pan over medium heat. Add chopped red onion and sauté until translucent. Add sliced mushrooms and continue to cook until broken down, about 5 more minutes, stirring often. Add chopped red pepper, cook for another 5 minutes. Add minced garlic, stir and turn off heat.

In a small bowl, whisk eggs, salt, pepper and turmeric.

To assemble quiches, spoon a tablespoon of mushroom vegetable mixture into each crust. Divide and sprinkle evenly with feta. Finish by pouring egg custard on top. Use a fork to jostle the center a bit to make sure the egg seeps down into the vegis. If using, sprinkle with grated cheese.

Return quiches to the oven and cook for 25-30 minutes, rotating every 10 minutes, or until fork inserted into the middle comes out clean.

Remove from oven and cool for at least 10 minutes before enjoying. Can be stored in the fridge for several days.

Relax. Eat Well.


Tuesday, January 15, 2013

Apple Cider Donuts


Ok, I have to admit first thing- these contain no apple cider. But Applesauce Donut did not have the same ring- and the spices and flavors just sing cider to me. So please excuse my blatant misnomer and embrace my benign intentions of conjuring up the most comforting, perfectly-spiced baked good possible.


Everyone loves a good donut. Let's just admit that as a group. With a steaming cup of coffee, preferably kicking off a road-trip, there is nothing quite the same. When we were crossing the country, or traveling throughout the west, the California 24-hour donut shops were a mandatory stop.

However, let's be honest. Although they taste like heaven, most donuts leave you feeling like crap-ola. So naturally, I had to come up with an alternative (especially given my donut loving-partner in crime). These donuts are based around freshly ground brown rice- providing whole grain fiber and powerful manganese and selenium. Unlike typical donuts that spike blood sugar levels, these provide long-lasting energy with quality carbohydrates, fat and protein.


But I promise you, it is the fresh orange zest and ample ground spice that send them over the top.

The soaked ground flax serve as a egg substitute- providing a binding quality without the animal protein. If you are siked on farm fresh eggs, simply substitute with 2 eggs.


The one catch- they do require a donut-maker. I am sure an oven-baked version would work with a donut pan, although I have not tested it and can not offer oven temperatures or cooking times. I am sure a little experimentation and a watchful eye will lead you in the right direction.


Apple Cider Donuts
Makes 20 small donuts
Ingredients
2 tbs. ground flax mixed with ¼ cup water
Zest from 1 orange
2 cups unsweetened applesauce
½ cup maple syrup or honey
1/3 cup extra-virgin olive oil
2 cups brown rice flour, preferable freshly ground
1 ½ teaspoon baking soda
1 teaspoon cinnamon
¾ tsp. pumpkin pie spice (mixture of allspice, nutmeg, cloves, cardamom and ginger, freshly ground if possible)
½ teaspoon salt

Directions
Preheat donut maker.

Grind rice flour freshly if possible.

Puree flax mixture, zest, applesauce, honey and oil in a medium bowl. Whisk flour, baking soda, cinnamon, pumpkin pie spice and salt in a large bowl. Create a well in the center of the dry ingredients and pour in the wet ingredients. Gradually stir the dry into the wet and stir until combined.

Spoon mixture into donut maker and bake for 5 1/2 minutes. Cool on baking rack before storing in an airtight container. Can be stored for 3-4 days, or frozen for delayed enjoyment.

Tuesday, August 7, 2012

Eggplant, Tomato and Zucchini Gratin with Basil Cashew Cream


This is a simple dish to celebrate the summer flavors filling the farm stands and bursting out of the gardens in August. Don't be intimidated by the seemingly long list of ingredients- they really aren't that scary. I have faith in you.


I grew loads of garlic this year as I ended up planting my entire harvest last fall. Garlic is my new favorite crop- plant your cloves in the fall, and in the spring, your garden will be sprouting with little green shoots before you have even sorted through your seeds. Each clove grows a new head of garlic, and choosing to plant your biggest cloves will promote larger growth. 


Soaking and pureeing raw cashews produces a luscious "cream" sauce- highly adaptable and simply delicious. Add a bit more water and you end up with a cream or salad dressing, use less and you have the perfect dollop for an appetizer or garnish. Eliminate the savory ingredients, add some maple syrup, cinnamon and vanilla and top your favorite dessert instead of whipped cream. Here are a few examples to experiment with if you are interested: No-bake Chocolate Torte, Eggplant Manicotti, Raw Chocolate Truffles.

Cashews are high in the monounsaturated fat oleic acid, the same compound found in olive oil, that promotes cardiovascular health. Also high in the essential minerals copper and magnesium, cashews provide important antioxidants for bone, muscle and nerve function. Like all nuts and seeds high in delicate oils, cashews are best stored raw in the freezer to avoid rancidity.


Eggplant, Tomato and Zucchini Gratin with Basil Cashew Cream
Serves 8

Ingredients

2 medium eggplants, sliced into rounds
4 medium zucchinis, sliced into rounds
1/4 cup grapeseed or olive oil, divided
1 large onion, chopped
2 cloves garlic, minced
3 large tomatoes, sliced

5 slices bread (whole grain or gluten-free)
1/2 tsp. garlic powder
1 tsp. fresh thyme
salt and pepper to taste

2 cups basil leaves
1 cup cashews, soaked and drained
2 tbs. nutritional yeast
2 cloves garlic, minced
1 cup water
1/2 a lemon, zest and juice
3/4 tsp. salt

Directions

Preheat the oven to 400 degrees. Toss the eggplant and zucchini with 2 tbs. oil and spread onto parchment lined baking sheets. Season with salt and pepper. Roast for 20-30 minutes, until tender and beginning to turn golden. At the same time, toast the bread in the oven for 10-20 minutes, until crunchy. Remove and cool.

Heat remaining 2 tbs. of oil in a medium pan over low-medium heat. Sauté onions until translucent, add garlic and continue to cook for 2 minutes. Season to taste and set aside.


To make the bread crumbs, rip toast into pieces and place in a food processor with garlic and thyme. Pulse until crumbled. Taste and season with salt and pepper.

For the basil cream, rinse the food processor bowl and add remaining ingredients (basil through salt). Process until smooth.

To assemble gratin, lightly oil a 9 x 13 baking pan. Add one layer each of eggplant, zucchini, onion and garlic and top with tomatoes. Spread on half the basil cream, and repeat layers in the same order. Pour on the rest of the cream and cover with breadcrumbs. Place in the oven and cook until heated through, about 15 minutes.

Relax. Eat Well.


Monday, April 2, 2012

Latin Quinoa with Lime Dressing


Sometimes grain salads can be a bit too heavy for me, which is why I often turn to quinoa for my whole grain needs. Light and fluffy, it always feels fresh and summery, regardless of the weather outside. I like the citrusy punch of the limes in this dressing, along with the earthy spiced undertones, and plenty of fresh vegetables. The olives add a saline touch, which offers punctuated flavor with limited salt. 


Quinoa has come into the spotlight in the US in the past ten years, despite its ancient roots in Incan land. Technically a seed, it is actually a close relative of both spinach and swiss chard, with quite an impressive nutritional profile. Quinoa is a complete protein, meaning it contains all 9 essential amino acids, which is rare in the plant world. High in magnesium and manganese, quinoa has been shown to ease migraine headaches, relax blood vessels and promote cardiovascular health as well as offer antioxidant protection. 


One of my favorite things about quinoa is it's quick cooking time: about 15 minutes. If you set it to soak overnight, it will take a few minutes off the stove, and leave it even easier to digest and assimilate. During the winter, I love to cook quinoa with amaranth to make a breakfast porridge. It is also wonderful with loads of cumin, cilantro and corn as an alternative to Dirty Rice. Really, it is hard to go wrong.

Latin Quinoa with Lime Dressing

Serves 6 as a side

Ingredients

1 cup quinoa
1/4 cup pumpkin seeds
1 tsp coconut oil
1 small onion, diced
2 cloves garlic, minced
1/2 bunch chard, cut into bite-sized pieces, dice stems
1 red bell peppers, diced
1/2 cup green olives, roughly chopped
1/2 cup cherry tomatoes, cut in half
1/4 cup dried currants

1 1/2 limes, zest and juice
1/4 cup olive oil
2 tsp. ground cumin
2 tsp. ground coriander
salt and pepper, to taste
1/4 cup cilantro, roughly chopped

Directions

Place the quinoa in a pot with 2 cups of broth or water. Bring to a boil and then turn down to a simmer. Cover and let cook for about 15-20 minutes, or until liquid is absorbed and quinoa is tender. Transfer to a large bowl to cool. 

While the quinoa is cooking, heat the oven to 200 and place the pumpkin seeds on a baking sheet.  Lightly toast in the oven for about 15 minutes.  Set aside in a bowl.

In the meantime, heat a large pan on medium heat and add the coconut oil. Add the onion and sauté until tender. Add the garlic and chard, including the chard stems and sauté for another minute, adding a little water if necessary, until the chard is soft. Remove from the heat and add to the bowl of quinoa.


Add the red bell pepper, green olives, cherry tomatoes, and currants. Lightly toss together.

In a separate bowl, whisk together the lime zest, juice, cumin, and coriander. Add the olive oil a little at a time, while whisking to emulsify. Add to the quinoa and toss gently to coat. Season with salt and pepper to taste, and mix in the cilantro and pumpkin seeds before serving.

Relax. Eat Well.


Wednesday, March 21, 2012

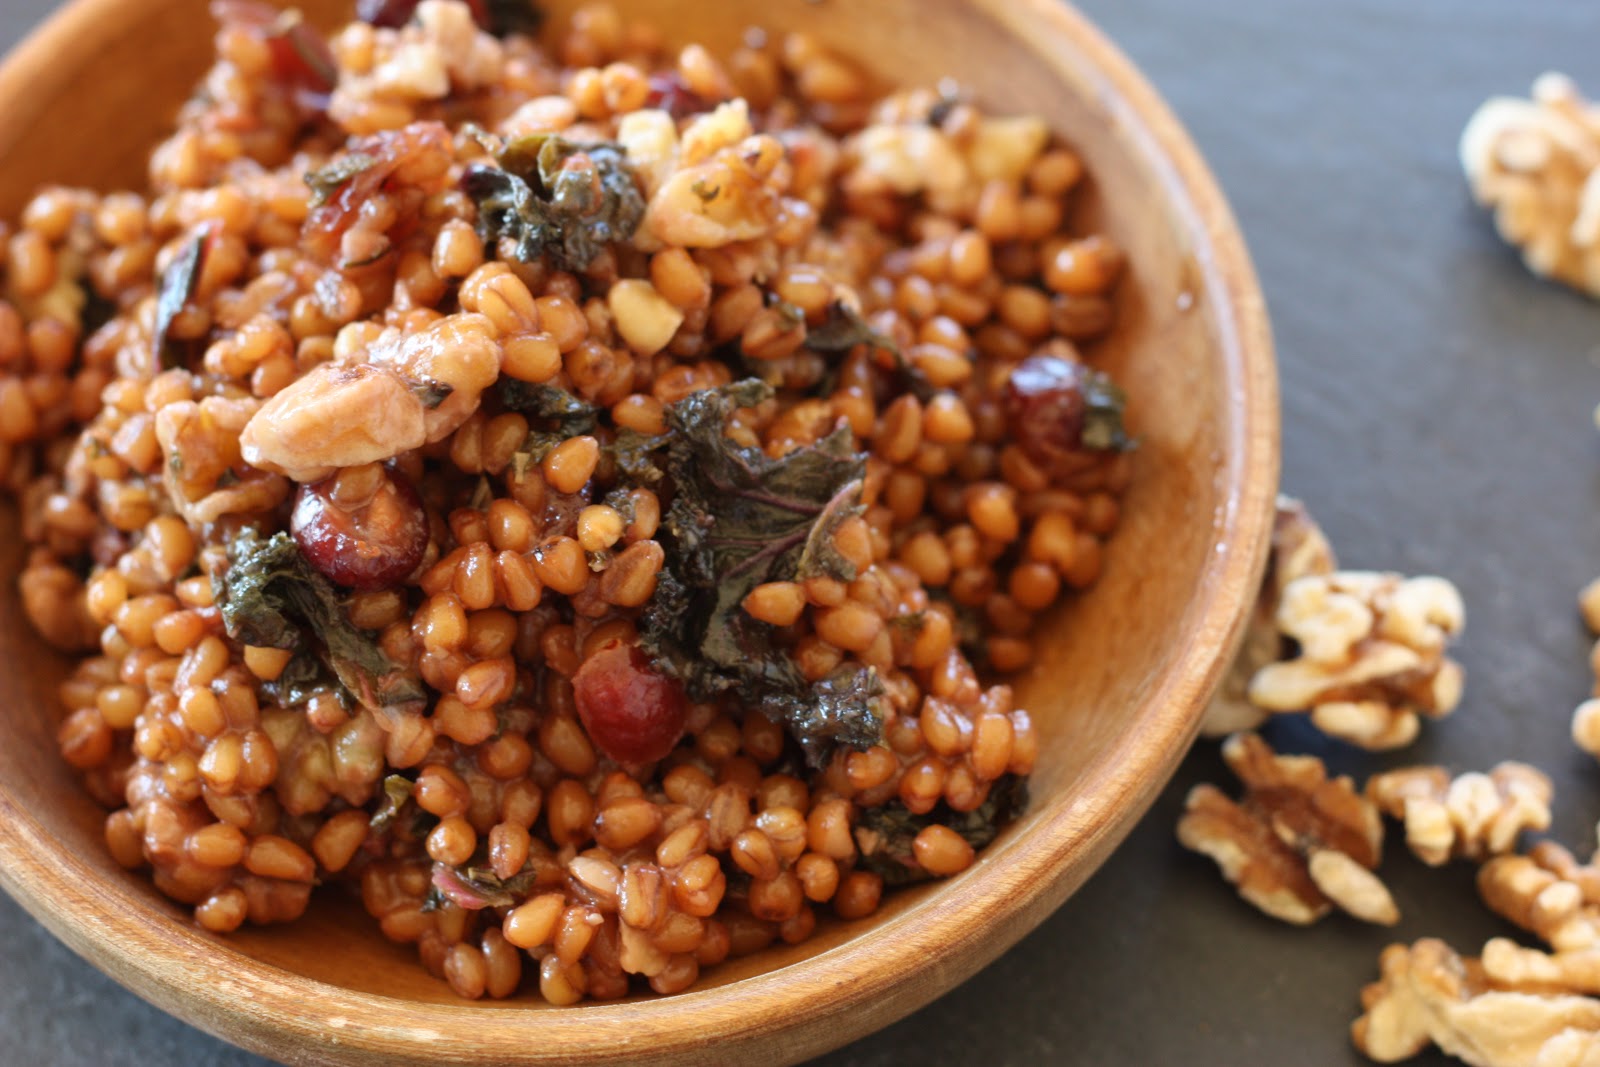
Winter Wheat Berry Salad


Ah the wheat berry. Have you ever had them? I am not sure at what point they were lost to the average American, but somehow this whole grain has become virtually absent in most home kitchens. Not to say that we don't consume our fair share of wheat. This is reflected on virtually any packaged ingredient list you read. The problem lies in the fact that our adoration for the grain is for its modified, refined and processed form. Most people don't even know what the whole grain looks like.


But here is the good news: whole wheat berries are simply delicious, healthy, and packed with fiber. In fact, I would argue that enjoying whole wheat berries again is the answer to our nation-wide wheat allergy crisis. I would be willing to bet that if we all committed to consuming unprocessed organic wheat berries in place of wheat flours, additive and enhancers, the allergy would virtually disappear. So here is your first step towards health, for yourself and for your neighbors. The next step? Don't forget to spread your enthusiasm.

A quick note: wheat berries do need to be soaked before they are cooked, much like a dried bean. Not hard at all, but does require a bit of fore-thought. Just set them out to soak the night before in a large bowl with plenty of water, as they will absorb quite a bit. Drain, rinse and cook the next day. If you are like me and like to have things easily on hand, prepare a big batch and freeze the extra after cooking in 2 cup portions.


I served this with Eggplant Manicotti last night for the CSK, and the flavors play off each other perfectly. Who needs cheese and pasta to make an Italian meal when you can have this instead?


If you like this recipe and want to try the warm weather version in a few months, make sure to try my Summer Wheat Berry Salad.


Winter Wheat berry Salad

Serves 6

Ingredients
1 cup wheat berries, soaked overnight
½ head of kale, chopped
2 tbs. pomegranate molasses
2 tbs. extra-virgin olive oil
1 clove garlic, minced
½ tsp. salt
½ tsp dried rosemary, crushed
½ cup walnuts, toasted
¼ cup dried cranberries

Directions

Drain soaked wheat berries and place in a large pot with plenty of water. Bring to a boil and lower heat, simmering until tender, with a pop, about 45-60 minutes. Add chopped kale, stir, cook until wilted and drain well in a colander. When dry but slightly warm, transfer to a large bowl.  

Whisk pomegranate molasses, olive oil, garlic, rosemary and salt together in a small bowl. Add to warm wheat berry/kale mixture and toss to coat. Taste and adjust seasonings. Before serving, toss in cranberries and toasted walnuts.


Relax. Eat Well.

Friday, January 27, 2012

Caribbean Millet Croquettes


It turns out, 40 lbs. of sweet potatoes is quite a bit. Sitting in my pantry, they dare me to sneak them into every dish I make, which is really never a mistake. I'll take what I can get for local produce these days, and sweet potatoes have always been one my absolute favorites (maybe that is why I got a little (over) excited with this purchase).


It was only natural that they made their way into my croquettes this week, adding a Caribbean flair that I could not resist nudging along further with some creamed coconut and sweet corn. Croquettes are typically fried dumplings, often filled with rich cheeses and coated in delicate bread crumbs (also known as "what I survived on" during the year I lived in Spain). This version uses nutty toasted millet along with ground nuts and seeds, yet still bursts with flavor and satisfying texture. Think croquette meets miniature veggie burger. Severely enhanced by a well paired sauce or spread, these were served with Coconut Whipped Yams. In the past (when not so Caribbean), they have been perfect alongside an edamole spread or mushroom gravy.


Rich in magnesium, fiber and vitamin A, sweet potatoes are a nice alternative to their popular white counterpart. Great sliced into wedges, tossed with a tablespoon of oil and a sprinkle of chipotle chili powder and roasted until golden and soft, there aren't too many these spuds can't charm. 


Caribbean Millet Croquettes
Serves 8


Ingredients
1 cup millet
2 cups vegetable broth or water
½ cup sunflower seeds, soaked
1 small sweet potato, finely grated
½ bunch scallions, minced
2 cups corn kernels
1 tbs. creamed coconut (I used this brand)
1 tbs. arrowroot
2 tbs. tamari, or to taste up to ¼ cup
½ bunch cilantro, minced
1 garlic clove, minced

Directions

Toast millet until fragrant and popping, about 4-6 minutes. Add 2 cups broth and keep at a simmer for 15-30 minutes, until liquid is absorbed. Meanwhile, drain and rinse sunflower seeds. Pulse seeds, sweet potato and scallions in a food processor until minced and well blended. Put in a large bowl and set aside.

Preheat oven to 375 degrees.

Remove from heat and puree half the millet 1 cup of corn, creamed coconut, arrowroot and tamari in the food processor to make a paste. Add remaining millet, corn, cilantro and garlic and pulse several more times to combine. Add to the bowl with the seed mixture and stir to combine. Taste, and add additional tamari if needed. Using circular molds, or clean hands, form croquettes and place on a parchment lined baking sheet. Bake at for 20-30 minutes, until golden brown.

Relax. Eat Well.

Sunday, January 15, 2012

Avocado, Roasted Squash and Tempeh Sushi with Homemade Pickled Ginger


These days, a meal just doesn't seem complete without some sort of root vegetable or winter squash involved. This is truly a winter sushi roll: grounded and hearty balanced with a nice dose of fresh. I used Kabocha squash, but you could easily use buttenut, parsnips or yams as well. It is really the rich sweetness we are after.

To me, avocados are pivotal to the successful vegetarian sushi roll, as they lend a certain unmatched creaminess and ability to satisfy the tongue. Another option might be some sort of flavored cashew cream drizzle (cilantro or basil?). The cucumber offers a crunch factor, and the tempeh a nuttiness, which all roll together into quite the flavor and texture burst. 

If you are making these rolls ahead for an impressive potluck contribution, store uncut and slice just before serving, to minimize "dryout".

Avocado, Roasted Squash and Tempeh Sushi with Homemade Pickled Ginger
Serves 6

Ingredients

5-inch peice of ginger, fresh
1/2 cup brown rice vinegar
1/2 cup water
2 tbs. unrefined sugar
1 1/2 tsp. salt

1 cup short grain brown rice
1/2 cup amaranth
1/2 cup coconut milk
3 cups water
tamari to taste

9 nori sheets
1/2 small kabocha squash, matchsticked
1tbs. coconut oil, melted
8 oz. tempeh, sliced thinly lengthwise
1 avocado, thinly sliced
1/2 cucumber, thinly sliced
1/2 bunch cilantro, washed
1 tbs. wasabi paste
1/4 cup tamari


Directions
To pickle ginger, slice as thinly as possible with a mandoline, or careful knife. Bring vinegar through salt to boil in a small saucepan, and add ginger. Turn down heat, and simmer for 10 minutes. Turn off heat and marinate for 30 minutes. Refrigerate until serving.

To roast squash, preheat oven to 375 degrees. Toss cut squash with coconut oil and salt, spread flat on a baking sheet, and roast for 25-30 minutes, stirring after 15 min, or until soft and beginning to crisp on the edges. Cool completely.

In a large pot, bring rice, amaranth, water and coconut milk to a boil. Turn down to a simmer, covered, and cook until liquid is absorbed, 25-40 minutes. Stir, add tamari to taste and cool.

Slice tempeh, cucumber and avocado.

Place a sheet of nori, shiny side down on a sushi rolling mat. Place about 1/2 cup of rice mixture on bottom third of nori sheet, and spread to reach both sides, ending with an even rectangle. Lie avocado, cucumber, cilantro stem and tempeh on top (for a visual, check the title picture). Using wet fingertips, wet the length of the end of the nori sheet. Carefully roll, tucking nori as it meet, into a neat and tight roll, moving away from you. Press to seal. Store if saving for later, or slice with a slightly wet knife into 6 if serving immediately. Serve with cooled and drained pickled ginger, as well as wasabi and a small dish of tamari.